Tech808
Moderator
Username: Tech808
Post Number: 12127
Registered: 8-2002

| | Posted on Wednesday, November 08, 2006 - 9:05 am: | 


|
RM ITALY
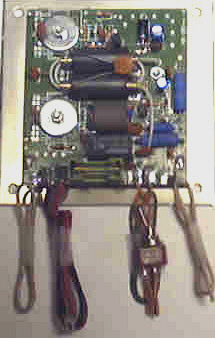
AD-203 STINGER BOARD
Copper Part: W90-30075
Non - Technical Review.
By
Lon ~ Tech808 ~ N9CEF

Connection Point's LEFT to RIGHT.
ANT ~ Power Supply ~ Power Switch ~ RTX
Part's Supplied w/AD-203 Stinger Board:
Qty - #1: AD-203 Stinger Board.
Qty - #1: Copper Plate (2-1/2" x 3") RF Shield (for use in some radio's).
Qty - #1: Pre-Wired On/Off Mini Switch.
Qty - #1: Parts package includes:
4 ~ small Phillips head screws & nuts for mounting AD-203 Stinger Board to radio.
1 ~ Replacement ~ 10 Amp/250V fuse (For replacing your factory radio power cord fuse.)
Qty #1: "General Application" Installation Instructions as Installation will vary for different radios.
Installation Instructions.
Equipment/Tools Required / Recomended for proper Installation.
A. ~ Good Accurate Watt Meter.
B. ~ Good Solderieng iron with a Small Tip.
C. ~ Silicone Heat Sink Compound.
D. ~ Small Phillip's Head Screwdriver.
E. ~ Small 7/32 Wrench or Socket.
F. ~ A very sharp Exacto knife or EXACTO or razor blade for cutting thin layer/cover off of the center strand and outer strand of coax from AD-203 Stinger Board.
G. ~ Patience when separating the center core / strand of the Micro Mini Coax from the Shield.
#1 ~ Remove speaker-side case of radio and remove speaker from the case.
(Save the 4 screws and nuts).
#2 ~ The Radio will need to be Modified so it will only key 2-1/2 to 3 watts.
Super mod down or down tune for best results.
#3 ~ Locate the Antenna Jack (Ant) on back of radio and remove Antenna wire from the SO-239 jack. Locate the "RTX" Coax and "ANT" Coax on the AD-203 Amplifier.
The "ANT" coax will go to the jack and the "RTX" coax will be soldered to the wire which was removed from the SO-239 jack.
NOTE!
BOTH of the Shields on the RTX Coax & ANT Coax from the AD-203 board MUST be GROUNDED to the CHASSIS per Installation Instructions!
The hardest part of the Installation is separating the center strand from the Shield on the RTX & ANT Coax from the AD-203 BE VERY CAREFULL WHEN DOING THIS!
HELPFUL TIP!
Carefully cut the Outside Clear Plastic on the RTX and ANT Coax (Take care to NOT damage the Shield) from the AD-203 and use a fine pick or paper clip to pull the Center (also plastic coated) of the Coax OUT of the surrounding Coax Shield.
#4 ~ The RED and Black power lead from the AD-203 Amplifier will be soldered to the radio Power Jack.
REPLACE the 3-amp fuse from radio with a 10amp fuse (Supplied) in the Radio's Power Cord.
#5 ~ The ON/OFF Mini Toggle Switch can be mounted on the Side, Top or Back of Radio by "Carefully" drilling a 1/4" hole for the switch.
#6 ~ Mount the AD-203 Amplifier where the speaker was Removed.
NOTE!
I applied Silicone Heat Sink Compound to the back of the AD-203 Mounting plate before connecting it to the speaker cover of the radio.
#7 ~ On some radios like the Cobra Sound Tracker radios a Copper Shield (SUPPLIED) will be needed on TOP of the MAIN Printed Circuit Board.
This will keep RF out of the Audio Circuit.
NOTE!
A (RF SHIELD) Copper Plate/Board (2-1/2" x 3" is also furnished.
Solder in on Top of the IF/RF Transformer.
#8 ~ Replace top case on the radio and replace the screws.
PLEASE NOTE!
While the RM Italy AD-203 Stinger Board will work on some SSB Radios without modifications in some cases it may be necessary to change the electrolytic capacitor to allow for SSB delay Per: RM ITALY's Installation Instructions.
NOTE!
This I did not have to do with the Cobra 148 GTL Soundtracker radio I tested it in.
DO NOT INSTALL IN ANY RADIO THAT WILL KEY MORE THAN (4) WATTS. per RM ITALY Installation Instruction's.
REVIEW.
I installed the AD-203 Stinger board in a Uniden PC 78 and a Cobra 148 GTL Sound Tracker radio.
I tested both radios with a 2 - watt dead key and a 3 - watt AM dead key.
Both radios were set to swing 10 to 12 watts output.
The Uniden PC78 had an output on AM of 65 ~ 70 watts.
The Cobra 148 GTL-DX had an AM output of 70-80 Watts
and a SSB output of 175 ~ 180 watts.
While saying a loud, FOURRRRRRRRRRRR
I did not push them to the max of 4 watts.
Final Comment's:
If you are looking for MORE power then I would suggest a larger amplifier.
The Quality of this product is exceptional and very well constructed.
I did not run into any major heat problems with normal conversations with other CEF Radio Club Member's from 5 minute to 15 minutes.
While the speaker cover did get warm it did not get to the point of being extremely hot to the touch.
The RM-3's are mounted to the board with the back's of all 4 ~ RM-3's having heat sink compound between them and the main metal mounting plate to help transfer/dissipate heat.
When mounting this plate directly to the Speaker side cover you are essentially increasing the cooling area of the board to the size of the radio cover.
Overall I personally think it is a GREAT little Stinger Board that works very well.
Respectfully Submitted,
Lon
Tech808
N9CEF
NOTE!
Review Corrected and Updated: 11/21/2003 |


