    
Forummaster
Moderator
Username: Forummaster
Post Number: 477
Registered: 11-2001

| | Posted on Friday, August 04, 2006 - 2:59 pm: | 


|
JCD-201M
Base Microphone
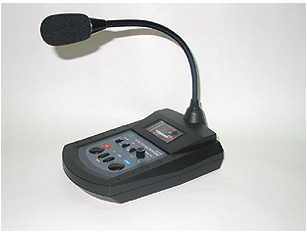
Technical Review.
By
Paul ~ Tech833
Power amplified CB microphones have been around almost as long as CB. Originally, most price-point CB radios did not have enough microphone amplification to reach 100% modulation levels with normal voice. People added amplified microphones to give the extra talk power they wanted in a lower cost radio. As electronics improved and became less expensive, it is difficult to find a radio that will NOT easily hit 100% right out of the box. Still, amplified microphones are popular since are able to keep the mic a comfortable distance away from your mouth and still easily hit 100% or more. Some people over-drive the radio input with their amplified microphones to increase talk power. Since radios have an automatic mic level limiter in them, this means that although you drive the audio harder than needed, the internal circuitry keeps the audio level low enough to prevent over modulation, but when you are quiet, will allow some of the quieter audio to pass through with nearly the same audio levels. This is essentially what we call ‘compression’
True audio compression works by trying to keep ALL audio at a certain level. In this case, the level we are shooting for is 100% modulation. By increasing the volume on quiet speech and lowering the volume on loud speech, it is then possible to increase the AVERAGE audio level. Keeping an average audio level high is not as simple as it sounds. The recovery time of the limiter has to be fast enough to increase the level of soft syllables in a single work. That’s fast!
Here’s why- Let’s take the word ‘paw’. The P is a sharp, high envelope sound, but the AW is soft. If you say the word ‘paw’ into your CB radio with a stock mic, the audio level output might look something like figure 1.
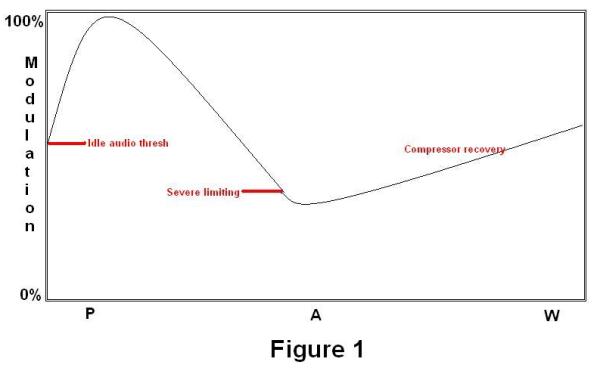
Notice how the sharp ‘P’ sets the audio limiter into motion, which lowered the radio audio level sensitivity so the quick rise of the P did not over modulate the transmitter. After the loud P passes through the circuitry, when the ‘aw’ comes through, the audio is still very low, and the radio ‘talk power’ is also low
Now, let’s speed up the recovery time a bit and say ‘paw’ again.
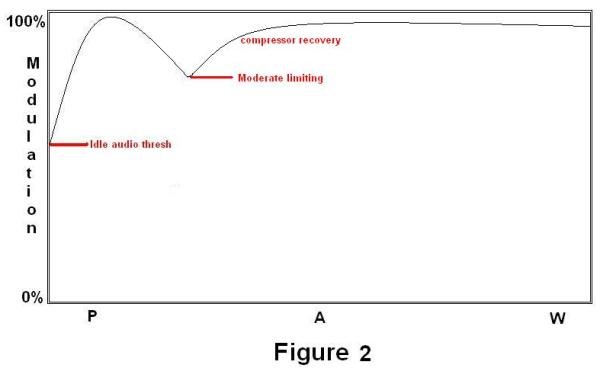
Figure 2 shows what the audio level sensitivity would look like with a very fast recovery time. You will see that the sensitivity was reduced by the P as before, but the audio level recovered quickly enough to get some of the AW to 100% modulation too. That is what we call increasing ‘talk power’.
So, why do we want more ‘talk power’? Your CB receiver sensitivity is measured in what we call ‘signal to noise radio’. That means we want maximum signal above noise for increased listen ability and an overall better copy. By increasing your talk power, you are increasing the amount of signal to noise ratio in everyone’s receiver. You not only sound ‘louder’ to everyone else, you also sound ‘stronger’. Your range is also increased in this manner by being louder than background noise on the channel. Commercial broadcast stations have been using audio compression for decades!
So, you can see why maximum talk power is so important, and why a compressor microphone is a must for any serious two-way radio op. So, why haven’t there been compression microphones around since the beginning? Well, until recently, the circuitry required to do effective audio compression added substantial cost to the end product. K40 broke the mold in the 1980’s by including audio compression into every radio they make. However, you will notice that a K40 radio costs 20-30 dollars more than a comparable Uniden or Cobra radio. The dollar conscious buyer would pass up the K40 radio every time to save those precious 20-30 dollars or get a radio that has other, more desirable features for that same radio buying dollar. The alternative is to buy a mic with its own compression at a later date.
Fast forward to today… Copper Electronics debuts the JCD-201M compressor microphone for the two-way radio user market. Not since the K40 Compressor mic or the Turner M+3B has there been a true compressor mic on the CB market. So, why did it take so long? The CB market is not the exploding industry it used to be, and amateur equipment makers have been seeing sharp declines in business as well. If you make a product for the ham or CB market, it better be GOOD!
Upon receiving the JCD-201M, the first impression I had was one of high quality. The plastic used for the base is fairly thick and resilient. The buttons and switches feel solid.
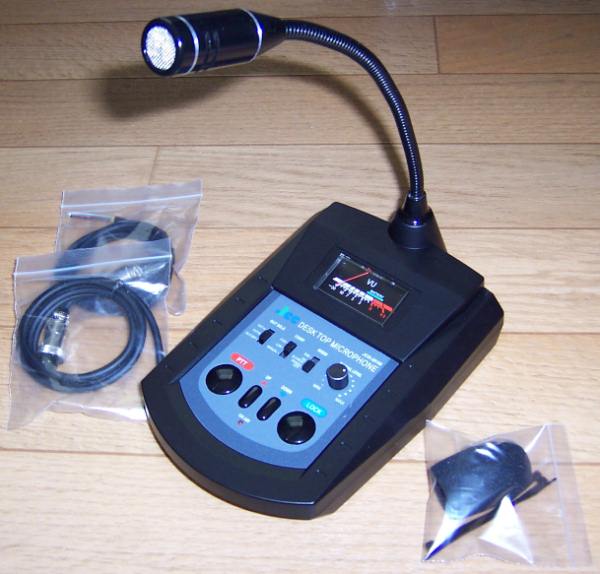
You can see in figure 3 that the JCD-201M has a great mic element setup, putting the element on the end of a gooseneck type mic stand. This lets you position the mic element toward your mouth for best speech intelligibility. The JCD-201M includes a foam cover for the mic element and it makes the whole thing look really professional.
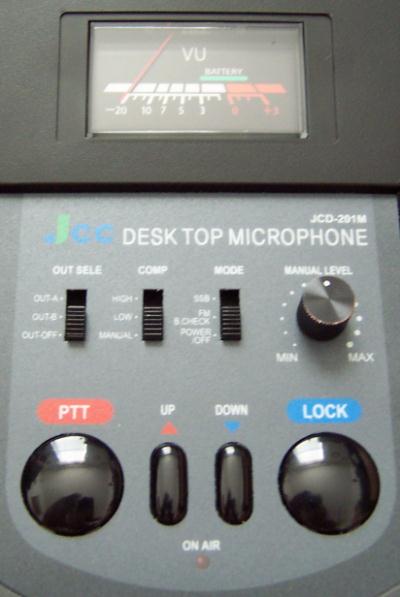
Going over the base mounted controls in figure 4, you see the modulation meter on top, showing the mic audio output level. The meter works whether the mic is keyed or not, so the audio circuit is always on, it seems. If you move the power switch to the ‘batt check’ position, the meter shows the battery level for about 2 seconds, then reverts to audio level function.
Scanning down the base a bit, you see a row of switches and a rotary control. The leftmost switch sends the keying and audio connections to one of two 8-pin output connectors on the back of the mic. This lets you have the JCD-201M connected to two radios at the same time, but only talk on one at a time by the flick of a switch. You can also select ‘none’. Scan to the right of that and you will see the switch labeled ‘comp’. This is the main compressor control, and the thing that enables the mic’s compressor. The ‘high’ and ‘low’ settings have only the effect of varying the compressor output level to your radio. Unfortunately, this does not seem to effect the compressor input sensitivity at all. By setting this switch to ‘manual’, the JCD-201M acts just like a regular power mic with apparently no compressor activity whatsoever. The mic’s uncompressed output level is then set by the rotary control on the far right.
The last switch on the top row, next to the manual level rotary control selects ‘SSB’, ‘FM’, or ‘OFF’. In SSB, the JCD-201M audio output has a noticeable increase in output level (to your radio), and increased audio frequency response in the 1kc.-2kc. range. In FM mode, the output drops slightly, but the audio frequency response is nearly flat from 100 Hz. to 10 kc. (+/- 6 dB) With this switch in the ‘Power off’ position, the circuitry in the JCD-201M is disconnected from the external power source or internal batteries to save energy.
Closest to the operator are 4 buttons. On the far left is the ‘PTT’ or ‘Push to Talk’. Everybody who has been on a CB knows what THIS is! On the far right is the ‘LOCK’ button. Pressing this and letting it go is the same as holding down the PTT. Your transmitter stays keyed until you press the PTT button. If you press ‘LOCK’ accidentally (or key up longer than 2.5 minutes), the JCD-201M will beep for 30 seconds, then unkey for you after 3 minutes. You can reset the timer any time (to stay keyed up longer) by pressing the LOCK button again.
Between the PTT and LOCK buttons are two others labeled ‘UP’ and ‘DOWN’. These will probably serve no purpose to most people, but on some ham radios, the UP and DOWN buttons are used to change channels or frequencies. Closest to the operator is the ‘on air’ light. Anytime the JCD-201M is keyed (or in LOCK mode), the on-air LED is lit. Anytime a button is pressed, the JCD-201M emits a ‘beep’ sound. If your mic gain is up enough, and you use the LOCK button for your keying, you get a little of the beep on the air when your signal comes on. This is neat because people can tell it is you instantly. If you don’t want the beep going over the air, just use the PTT.
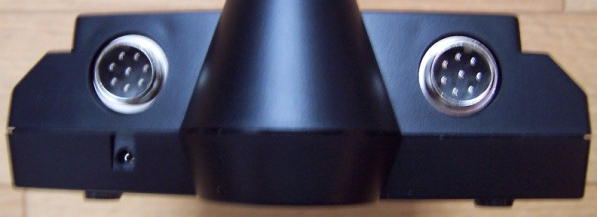
On the back of the JCD-201M (see figure 5), you see the two connectors for radio ‘A’ and radio ‘B’. Just below the radio B connector is a small jack where the cord from the optional foot switch plugs in. When plugged in, you can key the mic with the foot switch, freeing up your hands for whatever (fumbling through your log for instance). Most professional dispatchers use foot switches to key their radios so their hands are free to operate computer terminals and answer phones. It’s a lot of fun to be typing on your computer while holding a QSO on the radio with someone, try it!
Beneath the JCD-201M is the battery compartment. If your radio does not have 5 to 9 volts available for an external mic power, then you will have to use 3 AAA batteries to power your JCD-201M. One of my test radios does have 8 volts available on the mic connector; the other does not, so I had to use the batteries for some of my on-air tests.
Of course, I am sure you are at least a tiny bit curious what is inside the JCD-201M… So, since I am always out to please, I took my JCD-201M apart for you, saving you the trouble of possibly damaging yours for a look inside.
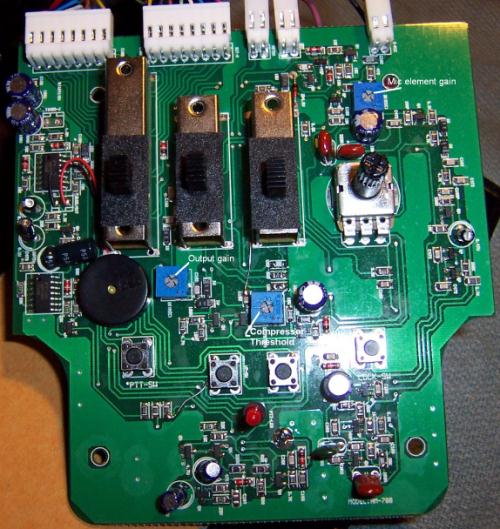
In figure 6, you see the circuit board. I added notes to the picture showing what each of the internal adjustments are for… You know.. Just in case! The bottom cover of the JCD-201M has a large chunk of metal attached to it so the mic is heavier and does not slip off your desk easily. It serves no electrical purpose.
When wiring the JCD-201M to each of my test radios, the very first thing I noticed was the wiring diagram in the owner’s manual is incorrect. The correct wiring connection schematic is-
1 (E) Shield – Ground
2 (M) Brown – Mic audio
3 (P) White – Ground
4 (G) Green – PTT +
5 (U) Black – UP
6 (D) Yellow – DOWN
7 (C) Blue – UP/DOWN Ground
8 (B) Red – 5-9 VDC power +
Bench testing was performed using the JCD-201M on battery power feeding a scope, spectrum analyzer, and headphones. I learned almost all of what I know about the JCD-201M while it was on the bench. I found the compressor circuit to have an attack time of about 20 ms. The release time is about 2dB/second. That is a little too slow for two-way radio work (in my opinion) and I would like to see this changed to a faster speed someday. The faster the better for most AM and SSB work. The output impedance was around 1K ohms, and changing the load impedance had very little effect on the frequency response. That is good news, meaning the JCD-201M will sound consistent regardless of what radio it is connected to. Enough bench time talking to myself on headphones, it’s time to get this baby on the air!
The HF radio I used in my on-air tests was a Kenwood TS-440. I check in to a SSB 75m net once in a while, and everyone on the net has become used to what I ‘sound’ like on my unamplified Shure desk mic. When I connected the JCD-201M, using the SSB setting, the first thing everyone noticed was I sounded louder and crisper. Some on the net asked if I turned on an amplifier. When switched to the FM mode, I was told that I sounded muffled and quieter. Using the highest compression setting and SSB mode yielded the best results. Stations in WY, CA, NV, and WA on the net that night all reported similar differences. Although my background noise increased as well, it was not objectionable. Speaking about 10 inches from the microphone seemed to be about the best compromise between loudness and intelligibility. If you ‘eat’ the JCD-201M mic, you will sound boomy and muffled when using the compressor. Back off a little and you will sound crystal clear, very ‘D-104 like’.
Same radio, but on an AM net, everybody told me to keep the JCD-201M and throw my old mic away. Thanks, guys. I could not drag much info out of the ‘gang’, but when I reconnected my old mic, everyone would come back to me with ‘HUH? Please say again..’. Looking at the transmitter output envelope on the scope did show a much more dense trace from the JCD-201M microphone than when using the Shure mic. In my headphones, the JCD-201M has less low-end (bass) response, but does improve the loudness by around 6 dB or more.
My second test radio was a VHF/UHF dual band FM-only FT-7800R made by Yaesu. Fortunately, the Yaesu has the ability to power the mic itself, so I did not use batteries for my FM mode tests. When talking on the repeaters, or simplex, nobody could really tell much difference between the Yaesu stock mic and the JCD-201M when it was on ‘FM’ mode. Just for gins, I switched the JCD-201M to SSB mode and everybody noticed an immediate difference in my loudness. When trying the mic on manual mode, nobody could tell the difference between the stock mic and the JCD-201M, but with the compressor on high, everyone noticed an increase in background noise. Turning off all noise sources in the room fixed that problem and everyone just reported clear audio.
My quick conclusion is that the JCD-201M makes virtually no difference on an FM radio like my Yaesu, but on an AM or SSB radio, the compressor and SSB mode together become a potent force. I could quickly tell the JCD-201M was working my Kenwood radio harder since the heatsink cooling fan started working a lot while I talked. Normally, the heatsink fan rarely comes on. However, the JCD-201M was pushing the transmitter so hard, the fan was needed.
Since CB radios are limited in power output (4 watts), the increase in talk power should be a noticeable improvement on anyone’s speaker. Wiring a JCD-201M to your radio is the next best thing to a substantial output power increase! Combined with the sturdy build and robust SMT circuit design, the JCD-201M will undoubtedly last for many, many years. I seldom go out on a limb for a product I did not design, however I have confidence in the JCD-201M and believe you will see an immediate improvement when you add one to your station.
Respectfully Submitted,
Paul
Tech833
|


